Sensor Box with Shield2Go Boards
Dual Sensor Box Kit based on ESP32
Description:
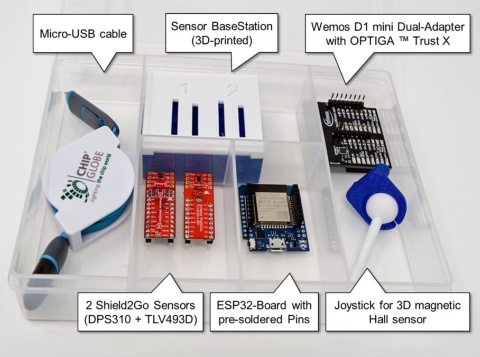
This Sensor Box is an ESP32-based kit of two Sensors (Barometric Pressure Sensor Shield2Go (DPS310) and the 3D Magnet Sensor Shield2Go (TLV493D)), which can get plugged onto the dual-slotted 3D-printed BaseStation, which is the white-blue colored 3D-printable plastic enclosure. No soldering required. Inside the BaseStation you place the the ESP32-Board (Wemos D1 mini formfactor) and the Dual-Adapter for Wemos D1 mini with OPTIGA™-Trust-X on board. Find the STL-Files for your customized 3D-print and choose the shape and colors of your choice. Note: The kit comes with an Micro-USB-cable and a 3-printed joystick for mounting to the 3D-Magnet Sensor. You can optionally get the ESP32-Board preflashed for Infineon’s internal cloud or the partner’s cloud. The acrylic storage box allows to store further XENSIV™ Shield2Go cardboxes. Find the collection of all Shield2Go Boards here : www.Infineon.com/shield2Go. You can combine any of these Shield2Go boards and plug them onto the base station.
Summary of Features:
- Combination of two XENSIVTM Shield2Go Sensors, controlled by ESP32
- OPTIGATM Trust-X for hardware security of the kit. This kit can get extended, becoming an edge sensor device (node) for a TPM based infrastructure, e.g. Raspberry Pi based
- No soldering required. No programming required. Ease-of-Use out of the box
Summary of content

The Dual Sensor Box contains:
- DPS310 – Barometric Pressure Sensor for Consumer
- TLV493D-A1B6 – 3D magnetic Hall sensor
- Joystick - Add on component for 3D magnetic Hall sensor
- ESP32 – Wemos D1 mini Formfactor including BLE and WIFI functionality
- Dual-Adapter Trust X – Adapter for Infineon Shield2Go in Wemos D1 mini Formfactor equipped with OPTIGA™ Trust X on board.
How to build one
Stack the boards according to these illustrations. Have a lool on these two videos, linked below.
Step 1:
Stack the inner of the 3D-printed enclosure

ESP32 Board (blue) with stacked Dual-Adapter for Wemos d1 mini
Optional Step:
Print a customized 3D-enclosure by using the attached DWG / STL-files if you want to make it special.

ESP32 Board with Wemos-Dual Adapter and 2 Shield2Go Sensors, one with the Joystick mounted.
Step 2:
Use the provided 3D-printed BaseStation like illustrated:

BaseStation ready for evaluating the 2 sensors
Step 3:

Mounting the Joystick to the 3D-Magnet Sensor
Step 4:
Plug-in the Micro-USB cable to power the BaseStation. You can use any standard USB-power supply.

Step 5
The Evaluation Kit is ready now.

You now can install the software
- Install the Arduino IDE (get the latest version from here)
- Add the WeMos D1 mini board in the Arduino IDE (read this)
- Add Arduino libraries for the Shield2Go sensors (libraries and instructions can be found here)
An example sketch can be found here.
Boards
| Image | Board | Family | Description | Status |
 |
S2GO PRESSURE DPS310 | Sensor | Shield2Go equipped with XENSIV™ barometric pressure sensor
|
active and preferred |
 |
S2GO_3D-SENSE_TLV493D | Sensor | Shield2Go equipped with TLV493D-A1B6 - XENSIV™ 3D magnetic sensor
|
active and preferred |
Software and documentation
Important Links
Infineon XENSIV™ – sensing the world product portfolio
Infineon for Makers: Full range of boards, kits, shields and development tools
Sensor ICs on LinkedIn - Follow us

